Image composition - Four basic points to keep in mind
Uploaded 24. Nov. 2010Composition is the general arrangement of the objects in your picture. Since photographic occasions and subjects are as diverse as photographers, there is no ultimate approach to generate a perfectly composed image. But there are a few basics thoughts regarding composition we'd like to share here:
Framing
your
subject
You can position the scene within your viewfinder as desired
and
adjust
the framing by just moving towards or away from your subject
or - if
you're not using a fixed focal lens - simply zooming in and
out.
Although framing can be easily adjusted in post-processing by
simple
cropping,
we'd recommend considering these things before you take pictures.
An already pleasing composition reduces the effort of
post-processing
and - more importantly - you cannot add more space around your
subject
or attach a clipped-off leg if it's not on your original
image.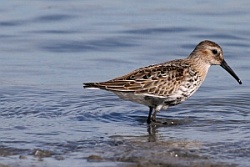
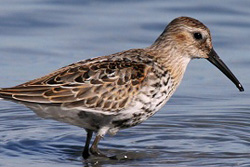
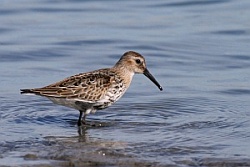
Three differet ways to frame
the
same dunlin.
The picture on the left is not framed very well - there is too much space behind the bird and no room at all in front of it; giving the expression that the animal is just about to leave the image. The picture in the centre is not optimally framed either. Since there's almost no space around it, the dunlin looks awkwardly trapped within the canvas and parts of the tail feathers are truncated as well. The picture on the right however is what's often considered well structured. There is plenty of space in front and some space around the object. At the same time, the bird is neither displayed too big within the canvas nor too small. The right-hand picture is also subjected to the rule of thirds (see below).
Rule of thirds
The
"rule
of
thirds"
is
a
compositional
rule
of
thumb
often
applied
in
photography.
The
idea
is
to
align
your
object
to
imaginary
lines
which
devide
both
the
horizontal
and
vertical
axis in thirds. Composing your picture according to
the hereby
resulting nine rectangles is
often
considered
aesthetically
pleasing. Many viewfinders can display grid lines to
aid composition
according to the rule of thirds.

The body of this dunlin makes
out roughly two thirds of the width, leaving one third empty
in front
of it.
The hight of the bird occupies approximately one third of the canvas.

The shoreline, water and horizon each make out roughly a third of the picture.
The hight of the bird occupies approximately one third of the canvas.
The shoreline, water and horizon each make out roughly a third of the picture.
Finding the right perspective
A proper perspective can make the difference between a lousy and an excellent picture. This can often be achieved by getting your camera on the same level as your subject:

A Lapland bunting from a top-down perspective (left) and on eye-level (right).
Click to enlarge images.
The two pictures above
display the
same bird and were taken using the same camera settings.
What's
different is the perspective: The photo on the left shows
the bunting
from a top-down perspective as seen from a
upright-standing viewer,
resulting in a rather dull perspective with the plumage of
the bird
amlost merging with its background. The picture on the
right however
was taken while lying
flat on the gravel. The photographer was thus on eye-level
with the
subject creating an more intimate face-to-face
perspective. Moreover,
the
subject is now clearly separated from the blurry
background.

European tree frog from an rather unusual bottom-up perspective
Aperture
and
depth of field
The last point we want to
address
here is the aperture, which is directly linked to the amount
of light
bundled through your lens and the resulting depth of field in
your
viewfinder.


 Mullein
Moth
caterpillar (Cucullia
verbasci) shot with different apertures, namely f 2.8 (left), f 5.6 (center) and f 11(right).
Mullein
Moth
caterpillar (Cucullia
verbasci) shot with different apertures, namely f 2.8 (left), f 5.6 (center) and f 11(right). Click to enlarge images.
It is important to understand
the
relationship between aperture and depth-of-field: If you use a
wide
aperture (i.e. a low f-number),
your
depth
of
field
will
be
quite
narrow.
This
means
that
the
area
in-focus
will
be
rather
small.
The picture on the left is a good
example for this: With a wide aperture of f 2.8, only a small part
of the
caterpillar's head is in focus, while the rest of the image is
very
blurry. If you close down the aperture a bit - like f 5.6 in the central
image - a
bigger part of your subject will be in focus and you will be
able to
recognize details in the background. With an even smaller
aperture of f 11,
most of the animal is now
sharp and the background is quite noticable.
I really appreciate a blurry background and a narrow depth of field like in the left hand picture; such a smooth and even background really makes your subject pop out. But the small in-focus area comes at a price: some details - like the caterpillar's back and feet - get lost and blurred out when using a wide aperture. So it's always a trade-off between a pleasing background blur and a gain in increased depth-of-field.
I really appreciate a blurry background and a narrow depth of field like in the left hand picture; such a smooth and even background really makes your subject pop out. But the small in-focus area comes at a price: some details - like the caterpillar's back and feet - get lost and blurred out when using a wide aperture. So it's always a trade-off between a pleasing background blur and a gain in increased depth-of-field.
There is of course no
standard rule
for a perfect composition. But keeping these points in mind
may help
you to improve your images.